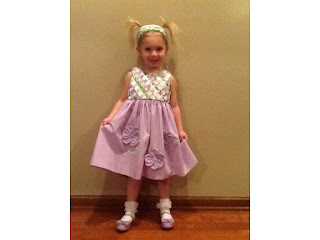
Here's my first "sew along" entry to Project Run and Play Season 6, the remix of the "The Party Dress."
The first week's challenge was a p
attern remix of The Cottage Home
Mama's Party Dress. Though we live in the cold Chicago area, I decided to think Spring and created an Easter Dress for C.
The first change that I made to the pattern was to shorten the front bodice yoke a bit and create a woven ribbon pattern at a 45 degree angle. (Can you tell that I teach teachers how to teach Math to their students?)
First, I drew 45 degree lines across the bodice using a purple marking pen that disappears after a certain amount of time. I used the grid on my cutting board to easily make those angled lines. These lines will help me line up the ribbons.
I placed the longest ribbon across the full bodice from shoulder to bottom seam. Then, I continued until I filled the entire shoulder area, all in the same direction. Then I sewed across the shoulder seam to hold all the ribbons in place.
See how I began to weave the next set of ribbons across the first set.
Do you remember doing this in school near Thanksgiving time to make placemats....I do.
Now we do it in Math to work on repeating patterns :)
I did use a repeating pattern as I wove the ribbons.
I thought it would be distracting to have a random pattern.
The pattern continued across the bodice. I started to sew along both edges of one particular ribbon, the purple ribbon with the large white daisies. I did that to prevent problems when this dress is cleaned at a later date and to stabilize the ribbon pattern.
It is getting easier to weave the ribbons and the process will begin to make you smile...
I continued to sew down the edges of the purple flowered ribbon ONLY.
Look how easy it is to add ribbons at this point. The really hard part was at the beginning while establishing the angle and pattern. Over..under...over..under..over...under..
This is how it looks from the back at this point.
Isn't it gorgeous!!!!
Don't you agree with me that a repeating pattern was a better choice than a random pattern?
When I began creating gathers, I learned to sew 2 rows of basting stitches. One row at 4/8 inch and the second row is at 6/8. This creates small,l smooth, vertical gathers when you finally sew your seam at 5/8 inch. I know there are easier ways, but I like the finished look.
On the back of the bodice, I shortened the button loops and added buttons without shanks.
Since there was no space for the button loops, I created my own shank with thread.
See how I placed a toothpick over the top of the button while sewing my stitches under and over.
When you remove the toothpick this will create an extra length of thread.
I came up from the underside of the bodice, but exited under the button. Then use your thread to circle around and around the extra thread "shank."
Lastly, knot the thread in the normal way, but under the button top.
This shows you how nicely the button loops lay down next to the fabric.
I also did not add the sash.
No sash... but I added three fabric daisies, with handstitched bias tape stems and leaves.
Yep, that's it... almost.. as I made a matching headband.
C loves it. She told me that she feels like a magical princess.
And what more joy can sewing bring to you than to create that special feeling for someone you love.
Deborah


