Pages

Monday, January 27, 2014

From Grandfather's Shirts to a Shirt and Skirt for ME

Hurrah, my Grandmother turned 2 of my Grandfather's shirts into this top and skirt just for me!

I saw her working late on her sewing machine. I just knew it would turn out great. Look how she used the collar ends to decorate the front of my shirt.

Look at my flutter sleeves(that's what Grandma calls them). They are made from the front of Grandfather's shirt. One side has buttonholes and the other side the buttons. Isn't that funny!


See how my shirt and skirt together look like a dress. It's just like two layers of big ruffles.


Oops, I got some chocolate on my hands from the tea party.

This is the back of my skirt and top.  See the tab and button from Grandfather's shirt. I liked this dotted red ribbon and Grandmother added it just for me.  She said I was "quite a designer."

Now that you've seen my outfit, here is my sister and I together. We are going to have a little party to celebrate our new outfits and the fact that we are home from school today.  It's -9 degrees outside and -30 when the wind blows. 

That's okay because I like staying home and playing with my sister.


The Felted Sweater Lives On Through Recycling


Wednesday, January 22, 2014

Reading and Sewing: Anne of Green Gables


This poster shows how Reading and Sewing can go together just like Peanut Butter and Jelly.
 
Our local library is participating in the READ Poster promotion through resources provided by the National Library Association and they helped create this poster. It is based on the book and movie, Anne of Green Gables. 
 
I created this outfit based on an updated look that Anne would wear in 2014 out of a grey woven fabric called chambray that children wore during Victorian times.
 
  This outfit was sewn as part of a challenge with Project Run and Play sewing contest and to encourage my
granddaughters' love of reading.
 
TO read more about how the outfit was sewn, click here.
Deborah

Anne of Green Gables Inspired Girls Outfit

When the costume designer for Anne of Green Gables, Martha Mann, created her costumes for the movie,  many were original pieces, constructed specifically for this film. Mann was faithful to Victorian styles, right down to the petticoats, furbelows, corsets and more.

My design reflects an outfit in colors and fabrics that Anne would love to wear, but updated for 2014.  It features a woven chambray fabric in light grey for the skirt and a white cotton knit for the long sleeve shirt. Since the fashions of Anne's time featured lace, ruffles, and feminine trims, so does mine.
Costume Design by Martha Mann

My ideas all came together when I found this silhouette created  by Miriam on her blog, Be Book Bound. She made it to create a piece of art, but I saw a new purpose that would create an unique outfit for Miss E.   Miriam invited her blog readers to use the silhouette that she created in Photoshop, and that's just what I did.


I began by bringing the jpg to Powerpoint so I could size it to fit the design idea that was floating in my head. I planned to print it, using a Avery T-Shirt Transfer Sheet,  on  the shirt in my design. 
Avery Light T-Shirt TransferI printed the design in grey-tone as I wanted a color that would blend with the light grey chambray that I had purchased for the skirt. I didn't just turn the design over and iron it on the shirt fabric, but I trimmed away the silhouette from the surrounding design so the edges would be cleaner. I love how it turned out!

Silhouette Shirt


I added a wide bow at the neckline that drips with lace and a trim that is feminine and old-fashioned at the same time.

For those beginner sewers, I wanted to let you know that I did not make the basic shirt. I was in Gymboree, because I love the quality of their knits, and purchased it for only $4.99 since it was part of a special sale. Since I can't buy that quality of fabric for $4.99, I decided to purchase it and embellish it with a matching bow and the silhouette. So if your just starting to sew, consider this as an option.


Layered Skirt

Next, the skirt features multiple layers of chambray cotton fabric with an elastic waistband.  Some of the layers are edged in an old-fashioned woven floral trim.  This trim really added body to the different layers and helped to create the feminine feel to the skirt.
Miss E especially liked the light, swirly, and comfortable skirt.


Since it is winter here in the Midwest, lavender tights were added to pick up the lavender color in the trim.

Wide-Brimmed Hat

I am really getting brave.  On my last outfit, I created a 6 panel knit hat to coordinate with the knit dress I designed.

This time I made this wide-brimmed hat out of the same grey chambray fabric. It was magical the way the heavy pellon interfacing began to bow and shape as I sewed the multiple rows of stitching in the wide brim.

I wasn't even sure that the multiple rows of stitching would create the shaped structure on the brim, but that's what I've seen on hats in stores....so I gave it a try.  WOW, was I ever happy. I hand stitched the black trim on the edges during the final step while making this hat.
To complete the old fashioned look, I added matching trim and a bow in the back.

Folks you are looking at pure magic, as I can't believe I actually designed the pattern and sewed this hat. 


At first, I considered buying Miss E some lace up boots similar to those worn by Anne. Yet, I designed this outfit to be an UPDATED version, so black patent shoes with a tiny wedge heel
 (so 2014!) were chosen.


So, here is my 2014 version of a garment that was inspired by the movie, Anne of Green Gables, modeled by Miss E :


Smiles,
Deborah


Monday, January 13, 2014

Fair Isle Knit Dress with Sock Scarf and Boot Toppers

My Winter Wonderland submission for Week One at Project Run and Play started with this cotton knit Fair Isle fabric from Girl Charlee.

Half Yard Red Green FairIsle Reindeer Pattern on White Cotton Jersey Blend Knit Fabric


On a cold winter's day,
there is nothing better than wearing a dress made with a cheery red and green print that is soft and cuddly. My granddaughter enjoys wearing clothing sewn with knits since they are so comfortable, and that's what made this fabric the perfect choice. The cowl neck on the dress will keep her warm too.

I wanted to challenge myself and use the 4-thread serger that I just added to my sewing room. I've seen garments with exposed serger stitches and I was excited to create an outfit with the serger stitches showing on the outside of the garment.


I wanted the stitches to be bright red and to show on the outside of the dress,  but not stick out straight from the garment. So I decided to sew the serger seam flat to the garment with a stretch knit stitch using my regular sewing machine.  Here is how it turned out:


I'm honestly not sure this is the way you should do it, but it does add stability to the seams. More importantly... it looks the way I want it to look in my head. The above 2 pictures show the right side and wrong side of the garment.

I can't believe how fast...if you don't count how long it took me to thread the machine,  I was able to sew this cowl neck t-shirt dress.
 
 This is first garment I've made using a serger. Threading the machine was a bit tricky..... I know that I have so much to learn.
Being a teacher, I believe that you can learn anything with the right resources...so I just bought a new book to read about different ways to use a serger and have been exploring internet sites that discuss serging. 
 
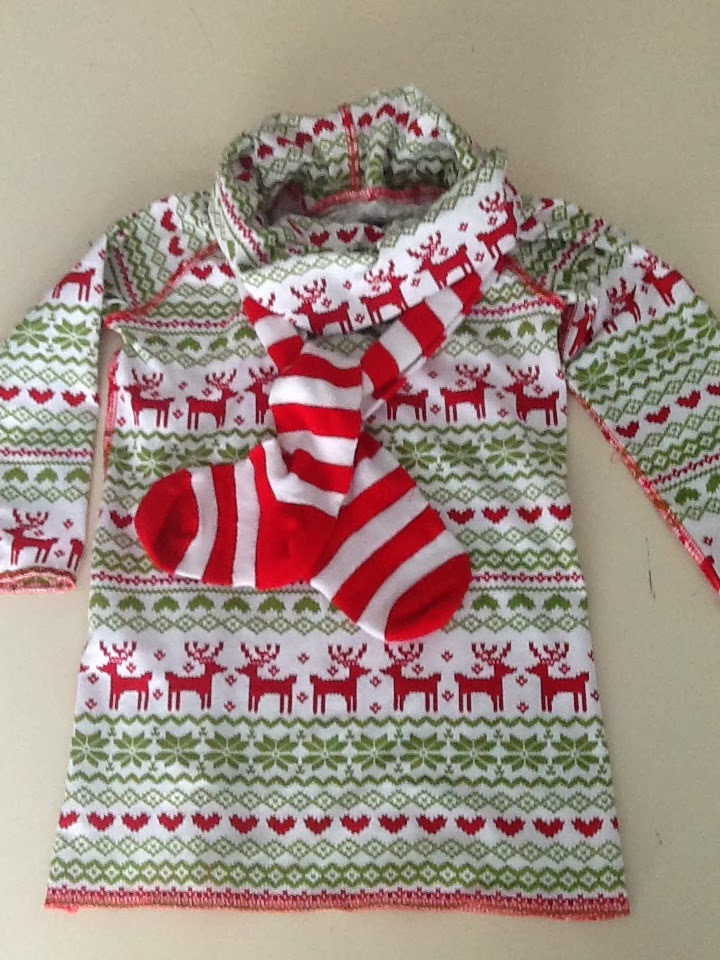
Here is a closer look at the completed garment...

 
Notice that I serged the hem on the bottom and on the edges of the sleeves.  I turned the fabric under to create a hem area that had a double thickness of fabric for extra stability before I serged the hems. Then, I trimmed away the excess.  


And now for my FUN ACCENT....
 a  sock scarf created from "over the knee women's socks." 
 
First, I cut off the top ribbing on the socks and then sewed the 2 sock together. Next,  I shortened the length of the foot to keep it proportional since the scarf is being worn by a four year old child. 
 
Also, to give the "foot area" more strength so the shape would not sag, I sewed lines of stitching in that area to quilt the  two thickness together.


Lastly, I made a pair of boot sock toppers with the same material to warm up the cuteness factor of the overall design.
This is what the boot toppers look like inside. The red edge is knit elastic that is inside the boot.

Lastly, here is my granddaughter modeling her new dress, scarf, hat, and boot toppers...


Keep warm,
Deborah


Related Posts Plugin for WordPress, Blogger...