Pages

Wednesday, November 16, 2016

Fringed Polartec Vest Tutorial

 When I was cutting out this fun fringed vest, I had unfolded the fabric to cut out the vest on a single layer of fabric. Suddenly, I realized that I didn't know which side was the right side of the fabric.
  Here is a quick test to help yourself decide
 which side is the right side:

Fleece fabrics curl to the right side when pulled along the selvage edges and curl to the wrong side when stretched on the crossgrain.

Some fleece fabrics also repel water because they are made from 100% polyester fibers and fleece pile fabrics are made from a blend of polyester and acrylic fibers. Since these fibers are hydrophobic , meaning that they retain very little water, they are great for outerwear.
To test for water repellency, just pour water on both sides of the fleece. If it beads up better on one side than the other, I would use that side as my right side when cutting out a water resistant jacket, for example. 

The fleece used in this vest was a medium weight and double sided, which means it was fuzzy on both sides. 


When I cut this vest out I lengthened it so the fringe would extend past her hips. Notice on the picture that I used the curve from the original vest pattern, and designed the back of the vest to be longer at the center back.
   On the side and shoulder seams, I gently finger pressed the seam open and then top-stitched on both sides of the seam. NEVER place an iron directly on the fabric. Since the fibers in the fleece are polyester and acrylic, the loft of the fabric will flatten by the heat and you can't change that.... it won't puff back up when the fabric cools.
   When cutting my fringe, I measured the desired fringe length and placed a row of pins in the fabric to indicate where to stop cutting the fringe.


 Then I used a see-through ruler and rotary cutter to cut my fringe to the desired width.
 It was so easy using the rotary cutter. 

Smiles,
Deborah

Monday, November 14, 2016

Emoji Polartec Vest

Emoji Power!

Kids love emoji. I bought this emoji graphic t-shirt and a pair of emoji jeans from Justice for my granddaughter.
Then I added my own creation... this double layer emoji vest.
I used reverse applique to make a large emoji on the back of the vest.

Here are some "how-to's" about reverse applique on Polartec fleece.
 1. Because Polartec fleece does not ravel, it is perfect for this technique. Choose a medium weight fleece so you will have clean, sharp edges.
2.   There is no need to put stabilizer behind the shape because you will be straight stitching and not zigzagging the outline so the fabric won't stretch out of shape.
3.  Place the two edges together and baste the outer edges of the layers together.  Trace your shape on the top fabric using a Chacopel Pencil from Clover. They mark easily on fleece and stay marked until you rub out the marks. Be careful and don't over-sharpen- just to a medium point. (A fine point will break too easily.) I ordered my pencil kit from Walmart and picked it up at my local store, though I'm sure they are available at other stores you might have in your area.


4.  I used 2 different colors of thread in the needle and bobbin to match each fleece color.
5. Straight stitch around the shape. (This would be a great place to use an outline stitch in some machine embroidery pre-made patterns too.) 
6.  Using sharp scissors, carefully trim away the inside of the motif, TRIMMING JUST THE TOP LAYER! This will reveal the contrast fleece underneath.  


Smiles,
Deborah

Sunday, November 13, 2016

Enhance Ready-Made Clothing with Your Sewing Skills

I love to use my sewing skills to enhance clothing
 that I purchase at a retail outlet.

For example, I bought this scarf at Justice, 
but it didn't have the fushia pink color 
in the thread pompoms that hung from the edge of the scarf.
So I made a few thread pompoms with embroidery thread and replaced a few colors that were all ready on the scarf.

It made all the difference in the finished outfit.

Look at how the Polartec fleece skirt topper, that I made to go over a pair of Justice leggings, now pulls the whole outfit together.

Smiles,
Deborah

P.S.  Here is an internet source for the Polartec skirt topper fabric: http://www.millyardage.com/ProductDetails.asp?ProductCode=7614

Saturday, November 12, 2016

Sewing with Polartec Fleece: Jacket, Hat and Skirt

 I 
Love
Sewing 

With 
Polartec
Fleece.
Soft
Warm 
with
Outstanding
Wearability.


Smiles,
Deborah


Fabric Obtained at:www.millyardage.com 

Sunday, October 30, 2016

Manniquin Christmas Tree: A Woodland Fairy

Last year, I posted about the Christmas Tree that I made using a mannequin. 

  Well, she's changing into a Woodland Fairy Christmas Tree.   


First, I started with the evergreen base that has tiny twinkle lights woven into the evergreens.


I made an apron of sorts with ribbons. Then I hand sewed silk ferns onto the ribbon bands. There are 4 different shades of ferns.
This shows the fern and ribbon apron being added to the skirt of the Christmas tree.
Remember that the evergreen base is peeking through the ferns and ribbons. I tested it, and the lights still shine through both layers.
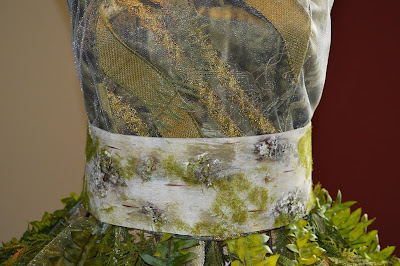
Now to add the beautiful top. It's made with a camouflage fabric that features the woodlands trees and foliage.  Then an overlay of golden tulle softens the overall appearance.  Sandwiched between the layers are golden trim,  burlap ribbons, and preserved spanish moss. 

Next, comes the cummerbund made from Birch bark with applied moss. 

It adds that bit of elegance.  Of course the cummerbund is accented with a burlap flower, pine cones and evergreen branches.  No lady should have such a beautiful gown without a bit of jewels.
And a bit of flounce in the rear of the garment to add more whimsy and elegance.


 Isn't she a fantasy come to life...I really don't want to send her back to my client. Perhaps, I just have to enjoy our creative adventure together and send her on her way.
Smiles,
Deborah

Monday, October 24, 2016

40 Minute Polartec Skirt

Tonight I sewed a skirt in 40 minutes!!! 

Hurrah Polartec Fleece!

Using Mc Calls pattern 6918, View B
1. (5 minutes) Cut out 4 pieces: Front /Back Yoke, and Front/Back Flare Skirt Bottom.
2. ( 10 minutes)  Sew yoke and flare skirt bottom together. Then trim away most of the seam allowances on the seam closest to the yoke, Fingerpress the remaining up towards the yoke.  Then from the top, topstitch so the seam allowance encloses the trimmed seam allowance.
Trim close to the stitching.
Right side, finished seam with topstitching

3. (10 minutes)  Sew the side seams together. Next fingerpress the seam allowance open. From the right side, topstitch each seam allowance down, using the stitched seam as a guide to sew a nice straight topstitched line. Trim excess close to stitching and you' ll have a unbulky seam that will feel good against your body.

4.  Sew edges of elastic together.
5. (12 minutes)  Stitch a row of stitching around the top of the skirt 3/8 " from the edge. Divide both the elastic and skirt top edge into 4 equal sections.
6. Using a stretch stitch and the row of stitching as a guide, slightly stretch the elastic until the section of elastic is the same size as the skirt. Stitch near the bottom of the wide elastic onto the flat edge of the skirt.

7. (3 minutes) Trim any excess fabric away, so it will feel good next to your body.
 DONE!!!         Love It !
Smiles,
Deborah
Friday, October 21, 2016

Seam or Edge Finishes with Polartec Fabric: Easy-peasy


Polartec, a wonderful fleece that I've been experimenting with, 
does not ravel; 
therefore,  there is no need for a seam finish or edge finish. 
Look at how easy I finished the edge of this double layered vest. 

1.  I quickly hand basted the 2 layers of fabric of a vest together using long running stitches while watching my favorite TV show.
2. Then,  I sewed 5/8 of an inch from the edge with the sewing machine.


3.  Using the first row of stitching as a guide, I sewed another row of stitching parallel from the first row.  I moved my needle all the way to the right on my machine, to obtain the largest distance from the first row of stitching.

It turned out like this. 


 4. Using your scissors trim the extra fabric away.  Take LONG cuts with your scissors to avoid a choppy edge. 


5.  On the straight areas, use a rotary cutting blade and a straight edge to trim away the excess fabric.


DONE!!!
Smiles,
Deborah

Tuesday, October 18, 2016

Emoji Polartec Vest for Girls

The emoji craze has hit the young girls' fashion world.  

I bought my granddaughter these comfortable jeans from The Children's Place.
Then, I started thinking about a comfortable, warm accessory that
 I might sew to compliment the jeans.

The Emoji Polartec Vest


Polartec is such wonderful quality fabric. 
 By quality, I mean wearability without pilling after a few wears.
 I dislike spending time and money on creating an outfit, and then seeing those pills appear because I bought the latest fleece deal!  Believe me, I speak from experience, and I learned my lesson. 

So this time, I spent a little more money and obtained a quality Polartec fleece from Mill Yardage

I'm loving sewing with this fabric and will be posting more about working with Polartec.  In fact, I've been thinking about a whole month of posting about sewing with Polartec fabric during the cold month of January. 
What do you think of my idea? 
 Would you like to learn more about sewing with Polartec ? 
Please let me know in the comment section of this post.
Smiles,
Deborah
Related Posts Plugin for WordPress, Blogger...