Pages

Wednesday, March 12, 2014

Sewing with the Iron

What?
How do you sew with an iron?
Well, here is what I mean.  See how much work I did on this lining before I attached it to the dress that I am currently sewing.  The seams are pressed open, and the bottom hem that will be hand-stitched at the waist is pressed under 1/2 of an inch. I even pressed under the center back seam near the zipper. That will help me when I sew in the lining and when I hand-stitch the lining near the zipper.

I also added a strip of lightweight interfacing along all the dress top seam, even though the pattern that I used didn't mention that step.  That interfacing will give that area some extra strength when I sew on a button for the straps. It will also give me some more body and a firm edge when I later add some topstitching. 
 
 
So that's why I say that I'm sewing with my iron.
 
Smiles,
Deborah

Tuesday, March 11, 2014

Adding Ribbon Edges to Netting/Tulle


Wow...working with Netting/ Tulle can be tricky.  Thank goodness the clerk at Hancock Fabric spent some time with me and explained some differences in this fabric.

First, there is very coarse netting to very fine netting, and they feel different when the fabric touches your skin.  My granddaughter is very picky when it comes to how a fabric feels, so I picked a netting called Illusion White Sheer Netting  that is very fine and soft.

Did you know that some nettings can be bought in widths up to
 108 inches!! That makes a huge difference when you are trying to add layers of netting over the top of fabric, because in order to get 108" on the bolt they fold it into 4 layers. 

I can't even imagine sewing a dress like this with so many layers of netting or tulle.  It would drive me crazy.

My dress only has 4 layers.

Here is a tip of how I made those 4 layers more eye-catching.
I used 1/8 inch Grosgrain black ribbon and 3/8 inch satin ribbon and sewed them to the hem edge of a layer of netting on my dress that I am creating. I used the grosgrain ribbon on the 2nd layer and the slightly larger satin ribbon on the 4th layer.
Look at how hard it is to see the fabric....Yikes!!!!
But now your eye notices the different
layers...Hurrah (cause I ain't adding anymore layers).
 
Smiles,
Deborah

Monday, March 10, 2014

Sewing my WILD Zebra Rocker Ballet Dress Tucked Panel

I'm working on my Project Run and Play Season 9 Challenge today.  This challenge is called, "Put Me in the Zoo Look."
 
I'm creating a no measure pleated panel for the front of my outfit and thought I would share it with you.
 
First, I only want 1 full panel instead of 2 smaller pieces as indicated by the pattern I'm using as the base of my design.
 So I overlapped the pattern to create the full panel.
 

Next, I started hand pleating a piece of fabric (45" wide) that was a bit larger than needed for my center piece. I did not measure each piece, I just estimated. 
 I don't care if each fold is the same size as that is the look
I am creating.


I pressed the pleats ever so often while pinning them, and then took it to my machine to sew a line of stitching on each side.
 
I placed my underlining which had been cut to the correct size of the finished panel and pinned it down , and then sewed around the piece. This made it easy to cut to the correct size.
Lastly, a bit of adjustment to the top and bottom of the panel so it will be easier to sew the seams later when I line the top of my dress.
 
That's it! Are any of you working on your first project too?
 
Smiles,
Deborah
 

Sunday, February 23, 2014

Younger Next Year... Or in 2014

I've been reading an interesting book titled, "Younger Next Year for Women."  The author begins with a quote, "Women, when they are old enough to have done with the business of being women, and can let loose their strength, may be the most powerful creatures in the world "

I feel that way. Liberated from major caregiving, and job commitments, I feel that I can take time to look at myself. Not out of selfishness, or narcissism, but out of interest in continuing to grow as an individual.  In my own way, that's what this blog is about... Growing.


Deborah

Friday, February 14, 2014

My Submission for Project Run and Play Contestant


"Have a heart and take a closer look at this Wizard of Oz jacket sewn by Deborah.  She sewed it with love for her granddaughter," said the Tin Woodman.
 
"She wasn't afraid to draw her own applique pictures or to line her jacket with fabric that was repurposed from her husband's shirt," cried the Cowardly Lion.
"She thought about how she could show the journey of Dorothy and her friends, and came up with a plan. I think she's quite clever at sewing and hand applique.... all those little hand stitches and they don't show," stated the Scarecrow.
 
And here's the finished jacket and hat...


"Deborah has been dreaming of competing in the Project Run and Play Challenge.  Please vote for her," pleaded Dorothy. 
 
 
Thanks to all my Wizard of Oz Friends for endorsing me. 
Deborah


Saturday, February 1, 2014

The Wonderful Wizard of Oz Jacket


Edna Woolman Chase on fashion. Design by ModCloth.
Edna Woolman Chase was the editor in chief of Vogue from 1914 to 1952
 
 
 My signature style has been influenced from my past experiences, love of color and fabrics, and my willingness to challenge myself to keep on learning new things.
 
 I created this jacket as my submission to the Project Run and Play "Signature Style Challenge".
 
As a youngster, I loved to read. I read all the fourteen different Wizard of Oz books.
 
Did you know there is even a map of the Land of Oz that was first issued in 1932?
 I use to refer to it as I read the books and add new landmarks on my copy of the map.
 

Map of the Wonderland of Oz
 
 
This past experience and love of reading influenced the creation of my "Signature Style" as I created this jacket for my granddaughter.

The original illustrator of The Wonderful Wizard of OZ  was W. W. Denslow, and his illustrations are quite charming.


These are the images that I used on my jacket, and not the Hollywood version of "The Wizard of OZ."


The Scarecrow


The Cowardly Lion
The Tin Woodman


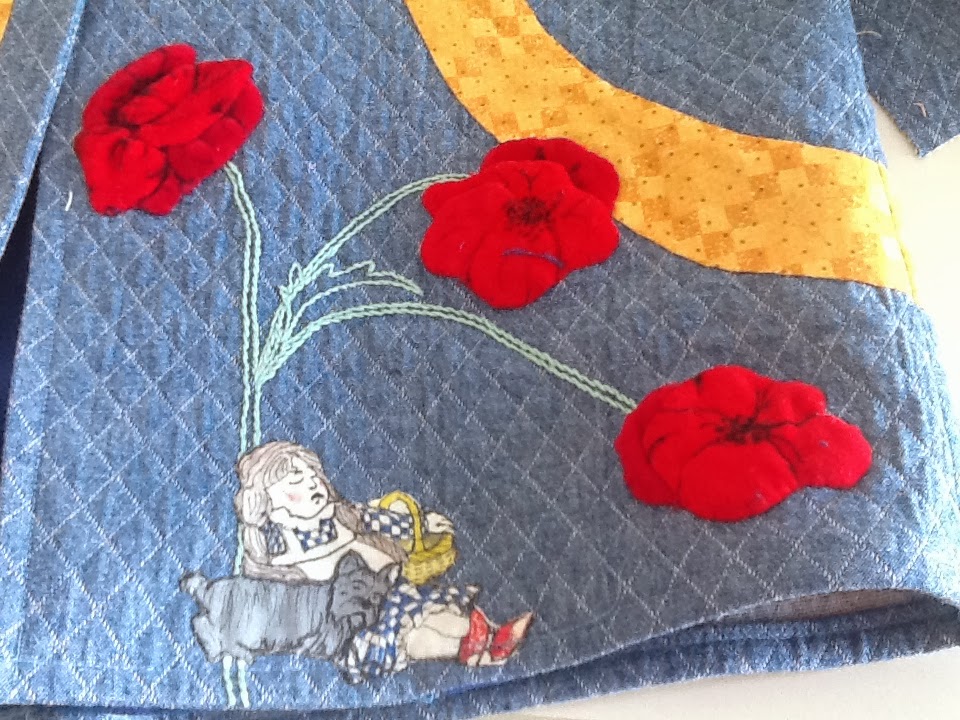
Dorothy fast asleep among the Poppies

I'm not that great of an original artist, but I understand color and can mimic the drawings that I see. So I used a fabric marker and drew on white fabric, which I then colored and shaded using permanent fabric markers and paint with textile medium added to the paint.
  Dorothy was hand stitched onto the blue fabric after I drew the image on the white cotton fabric.
 The multi-layed Poppies, for example, are red velvet fabric with black marker used to add details to the flowers. The stems on the flowers were  embroidered using embroidery thread. 

My granddaughter was so scared while watching the movie when  Dorothy and her friends
were walking through the forest.
 I just had to add a fighting tree from the forest.

Of course, the story begins when Dorothy's house landed on the Wicked Witch of the East.
 
Does the jacket show a drawing of the Wicked Witch of the West?
 
Well I've never really liked W. W. Denslow's image of the Witch, so I tried drawing my own.
 
I drew her and then sewed her to the jacket, but 
 but then I removed her the next day, as she SCARED ME!

 
I challenged myself to create this journey through the Land of OZ.


I really enjoyed the journey, as I manipulated the fabric and colors to create my own signature outfit.

The Jacket Back

The jacket lining was repurposed from one of Miss E's grandfather's

micro-fiber shirts. 

 As soon as she tried in on she said,"OOOh, that so soft."

Notice the funky, huge, easy to close snaps that I used to close the jacket.
 I wanted the front  of the jacket to be focused on the yellow brick road, and not on any buttons that might visually interfere with the view.
For the same reason, I did not add a collar.


The back of the lined jacket has a pleat with this button tab sewn at the top of the pleat.  Each button is a combination of 2 or 3 buttons.


The Matching Hat

There are many more wonderful characters in the story that are not shown in the movie.
 
Two other characters are illustrated on the matching hat.

The first character lives in the Country of the Quadlings. He tried to prevent Dorothy and her friends from getting to the Good Witch of the South. He is a HammerHead.

The second character is a Kalidah,  which is a great beast with a body like a bear and a head like a tiger.


Notice the 9 hole buttons that I used to create the word "OZ."
These COOL monogram buttons are available in 2 sizes and many colors.

 Since these buttons are hard to find, I am providing this link to the fabric shop that I purchased the 9 hole buttons and large snaps. You can purchased the buttons by giving them a telephone call .

And now for the most important part of this outfit... the model.


. . . Always glad to be home,
Deborah and Miss E

Monday, January 27, 2014

From Grandfather's Shirts to a Shirt and Skirt for ME

Hurrah, my Grandmother turned 2 of my Grandfather's shirts into this top and skirt just for me!

I saw her working late on her sewing machine. I just knew it would turn out great. Look how she used the collar ends to decorate the front of my shirt.

Look at my flutter sleeves(that's what Grandma calls them). They are made from the front of Grandfather's shirt. One side has buttonholes and the other side the buttons. Isn't that funny!


See how my shirt and skirt together look like a dress. It's just like two layers of big ruffles.


Oops, I got some chocolate on my hands from the tea party.

This is the back of my skirt and top.  See the tab and button from Grandfather's shirt. I liked this dotted red ribbon and Grandmother added it just for me.  She said I was "quite a designer."

Now that you've seen my outfit, here is my sister and I together. We are going to have a little party to celebrate our new outfits and the fact that we are home from school today.  It's -9 degrees outside and -30 when the wind blows. 

That's okay because I like staying home and playing with my sister.


Related Posts Plugin for WordPress, Blogger...