Pages

Showing posts with label Girls Jacket. Show all posts

Friday, March 20, 2015

Mouse Madness Knot Dress

Since there are only 10 hours left to link up to the Project Run and Play Knot Dress Challenge and my granddaughter is off to see her father this weekend, I don't have a model to show off her new dress that I just completed.

I designed it to be a simple, comfortable ... yet more grown-up dress.
I changed the straps and made the back strap longer and the front strap shorter. Then I overlapped the back over the front and sewed on a button through both layers. Lastly, I tied a knot in the longer back strap.

The fabric used in the dress is a Riley Blake knit. I use Riley Blake knits a lot because they are such a nice quality and a reasonable price. I want fabrics that will wear and launder well.


The short woven crop jacket features a Mickey and Minnie Mouse black and white cartoon with a sprinkling of red.


When she put it on originally for a fitting, she broke out dancing in  
HIP-HOP style... 
so I think she likes it.

Smiles,
Deborah

Friday, September 19, 2014

The Repurposed Princess


We hope you enjoyed our story.  

This repurposed outfit was created as an entry to the Project Run and Play's Season 10  Challenge for Week  Two. The cost for the whole outfit was $10 for the ribbon and buckle.  Everything else was either repurposed or in my stash already!
Smiles, 
Deborah

Monday, September 15, 2014

"I Love My Daddy" Care Bear Jacket

You'll find my Care Bear Jacket entry in the Sew Along Group.  
It is so much fun sharing my ideas and reading about other garments created for each challenge.

The first challenge is 80's Cartoon Inspired.  


I love the soft colors, cuddly fabrics, and positive vibe of the Care Bears.  They were always willing to help each other and solved problems together.

As a child, my 6' 5" son-in-law collected all the Care Bears that are shown in the picture above.
 So I thought he would enjoy seeing
 his daughter become his very own...
 "I Love My Daddy" Care Bear.

These are the fabrics used to make the jacket. Notice that I used WOOL felt. While constructing this jacket, you need to use the highest steam heat setting on your iron. Since you don't want to compress the felt, or have it melt, be sure to use wool felt.
Wool felt can be dry cleaned too. Lastly, the combination of wool felt, fleece, and minky lining will provide the warmth needed for cold Minnesota winters.

This is the pattern that I started with.
Simplicity 1477

Here are some of the changes that I made to the pattern:
  • I drafted a different coat front that was double breasted.
  • Made a separate front facing 
The pattern pieces I drafted to change the pattern.
  • Lined Belly pockets
  • Hood has hand embroidery and added felt Care Bear features
  • 4 buttons
  • Top-stitching at the hem line and on the edges of the jacket
  • Bear ears 
  • Lengthened the sleeves to make turn up cuffs  
  • Though the pattern instructions don't mention it, you must reduce the amount of thickness in every seam allowance anytime you can. I basted each fleece fabric piece to the felt at 4/8 inch and trimmed the excess fleece away to reduce the thickness. I graded the felt seam allowances also.
    Grading the seam allowances


The Care Bear were my inspiration, but I didn't want it to look like a costume. So I used the characteristics of the Care Bear cartoon characters that I liked..pastel colors, cuddly fabrics, and positive vibes while designing this jacket. 

The scariest part of sewing this jacket was making the buttonholes. I actually practiced making 10 buttonholes before I was ready to sew them on the jacket. After all the work that went into making this jacket, I DID NOT want to screw up the buttonholes!!
Thank goodness they turned out fine, but I have to share the fact that my heart was pounding while I was sewing them. Two of them were a bit close together, so I used my husband's box cutter with the razor blade in it to cut the fabric.


Smiles,
Deborah

Saturday, February 1, 2014

The Wonderful Wizard of Oz Jacket


Edna Woolman Chase on fashion. Design by ModCloth.
Edna Woolman Chase was the editor in chief of Vogue from 1914 to 1952
 
 
 My signature style has been influenced from my past experiences, love of color and fabrics, and my willingness to challenge myself to keep on learning new things.
 
 I created this jacket as my submission to the Project Run and Play "Signature Style Challenge".
 
As a youngster, I loved to read. I read all the fourteen different Wizard of Oz books.
 
Did you know there is even a map of the Land of Oz that was first issued in 1932?
 I use to refer to it as I read the books and add new landmarks on my copy of the map.
 

Map of the Wonderland of Oz
 
 
This past experience and love of reading influenced the creation of my "Signature Style" as I created this jacket for my granddaughter.

The original illustrator of The Wonderful Wizard of OZ  was W. W. Denslow, and his illustrations are quite charming.


These are the images that I used on my jacket, and not the Hollywood version of "The Wizard of OZ."


The Scarecrow


The Cowardly Lion
The Tin Woodman


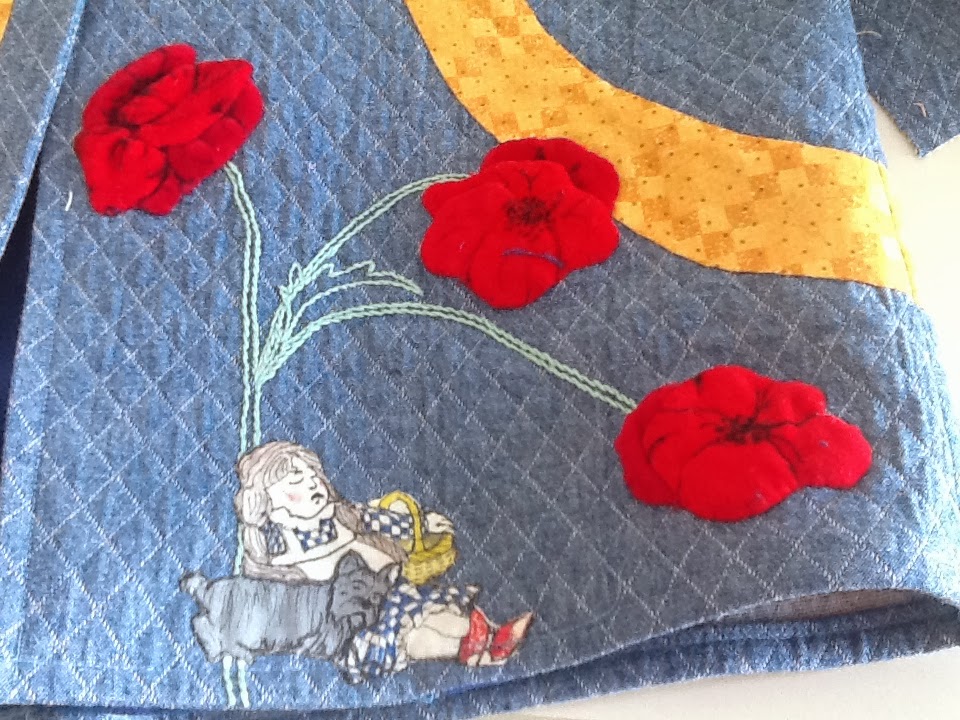
Dorothy fast asleep among the Poppies

I'm not that great of an original artist, but I understand color and can mimic the drawings that I see. So I used a fabric marker and drew on white fabric, which I then colored and shaded using permanent fabric markers and paint with textile medium added to the paint.
  Dorothy was hand stitched onto the blue fabric after I drew the image on the white cotton fabric.
 The multi-layed Poppies, for example, are red velvet fabric with black marker used to add details to the flowers. The stems on the flowers were  embroidered using embroidery thread. 

My granddaughter was so scared while watching the movie when  Dorothy and her friends
were walking through the forest.
 I just had to add a fighting tree from the forest.

Of course, the story begins when Dorothy's house landed on the Wicked Witch of the East.
 
Does the jacket show a drawing of the Wicked Witch of the West?
 
Well I've never really liked W. W. Denslow's image of the Witch, so I tried drawing my own.
 
I drew her and then sewed her to the jacket, but 
 but then I removed her the next day, as she SCARED ME!

 
I challenged myself to create this journey through the Land of OZ.


I really enjoyed the journey, as I manipulated the fabric and colors to create my own signature outfit.

The Jacket Back

The jacket lining was repurposed from one of Miss E's grandfather's

micro-fiber shirts. 

 As soon as she tried in on she said,"OOOh, that so soft."

Notice the funky, huge, easy to close snaps that I used to close the jacket.
 I wanted the front  of the jacket to be focused on the yellow brick road, and not on any buttons that might visually interfere with the view.
For the same reason, I did not add a collar.


The back of the lined jacket has a pleat with this button tab sewn at the top of the pleat.  Each button is a combination of 2 or 3 buttons.


The Matching Hat

There are many more wonderful characters in the story that are not shown in the movie.
 
Two other characters are illustrated on the matching hat.

The first character lives in the Country of the Quadlings. He tried to prevent Dorothy and her friends from getting to the Good Witch of the South. He is a HammerHead.

The second character is a Kalidah,  which is a great beast with a body like a bear and a head like a tiger.


Notice the 9 hole buttons that I used to create the word "OZ."
These COOL monogram buttons are available in 2 sizes and many colors.

 Since these buttons are hard to find, I am providing this link to the fabric shop that I purchased the 9 hole buttons and large snaps. You can purchased the buttons by giving them a telephone call .

And now for the most important part of this outfit... the model.


. . . Always glad to be home,
Deborah and Miss E

Related Posts Plugin for WordPress, Blogger...