Pages

Friday, June 29, 2018

One-piece Knit Romper with Shorts


Miss Comfy loves her new knit one-piece romper. 

It has a built-in panel that allows the bodice front to gracefully lay in pleats with complete coverage. 
It's easy to get on...just slip it over your neck.
Here's a look at the back.


Front view.
 It's a  German pattern that I bought online from Makerist.
Here is the name of the pattern:

  Jumpsuit SummerBreeze Junior Gr. 122-164

Von Mamili 1910  

Note: One thing that I changed in this pattern is the size of the band that goes around the waist. I shorten the width in the front slightly, and sewed a piece of elastic into the top seam on the back band.  When I sew this pattern again, I plan to make this band in the same fabric as the shorts.

Smiles,

Deborah


Tuesday, June 26, 2018

Scuba Fabric: Hip Wrap-Around Skirt, Top, Leggings


Scuba Fabric is so fun to work with as it gives you the freedom to create garments with raw cut edges.
So when I created my entry for the Project Run and Play 
I felt that this outfit best represented my own unique style, taste, and showcases my skill set when sewing.

Creating an outfit than also satisfies the wants of a pre-teen girl... can be risky too.  So I always try to discuss the project with her as I sew, so she will be happy with the finished project too. I wanted long sleeves for the fall...she wanted short sleeves. I wanted an all raspberry top... she wanted all black.                        So I compromise and she compromises too. 

The pattern for this skirt is a German pattern.

BeeRocky Kids Gr. 110 - 152 in zwei Längen

No, I don't speak or read German!  I use Google Translate   my own sewing knowledge, and the pictures for directions.
First, let's talk about the "fanny pack purse" on the front of the skirt. The original pattern had a snapped-on detachable purse which I made into a purse pocket sewn directly onto the skirt.
Using my own sewing knowledge about working with scuba knits (doesn't ravel), I knew that I could use a cutting blade to cut out an even edge on the pocket, and an opening for the zipper. The pocket would not be faced.

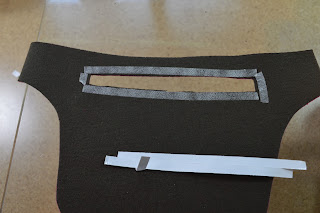
Then I used Dritz WashAway Wonder Tape around the pocket edge. You can stitch through this double-sided transparent tape without gumming your needle. So I used it to hold my zipper in place, while I sewed around it. In the photo, I have removed the protective paper. When I sewed around the zipper, I did 2 rows of stitching. One to hold the zipper in place, and one for FUN!
 

Then I laid the pocket onto the skirt front and top-stitched it into place. Lastly, I topped the edges with the circular patch for extra strength.  So when you look at this pocket edge you are viewing a raw edge.
This skirt sits below the waistline and hugs the hips.
I sewed the darts in this way because of the scuba fabric :
Mark your dart and iron a circle of fabric at the end of the dart.


 Cut the dart side open nearest the center back.


Overlap the dart edges and use stitch witchery under the dart and iron.

On the outside of the skirt sew one or two lines of stitching to hold it in place. I decoratively sewed two rows: down, turn,  over one stitch, turn, sew up. Now it's flat and still hugs the body with no bulk.
I also overlapped my side seams and sewed them flat.


The skirt is secured with a snap tape.


 Lastly, the original skirt was meant to be lined, but I cut a separate facing that was sewn onto the skirt wrong side to wrong side. Then I added a edging to finish the edge. No need to hem the skirt, just use the raw edge.
 
The facing and edging were added to strengthen the waistline seam and add a pop of color at the top of the skirt.   

A simple black knit tee, with added skuba knit cold shoulder sleeves was sewn to compliment the skirt.  
The same black knit fabric was used to make the relaxed fit elastic waist leggings/pants.
The legging were tucked inside her black boots.
We love it and hope you like it too. Any questions? Just comment below, 
as we read every comment and respond.

Smiles,
Deborah


Thursday, June 14, 2018

Stripes "Gone Wild" T-shirt with Matching Shorts

This shirt features stripes of all kinds.
Squiggly stripes and a standard black and white stripe, a stripe formed when I placed a 1 1/2 inch wide folded strip of fabric in the diagonal seam between the main panel and the side panel, and stripes created with topstitching details. 

Can you see the stripes created with the red topstitching thread and "the hemstitch" pattern on my sewing machine?
I decided to create a band of fabric to edge the hood. The stripe will "frame" the face of the wearer and create a lot of visual interest.
This is how I did that:

First, I cut out two sets of hoods in the solid red fabric.
 I measured an equal distance from the edge of the pattern down the front edge of the hood. Cut away that band of the hood ( the amount I decided on includes the seam allowance).


 Cut 2 hood bands out of a contrasting color or pattern. Since I needed the stripes of squiggles to match, and I was using scraps of that fabric to cut out this band,
 I first cut only one the the bands.

 Then I placed the first band right sides together on the fabric and exactly matched the stripes.  Now I knew that the stripes would match when I cut out the second band. 

 After cutting it out,I immediately sewed those two pieces together at the top of the hood seam allowance.


Since I didn't have to worry about ruining my only pattern because I could just print out another hood from the PDF. I cut that 3/8 inch seam allowance off of the hood stripe band, then I used the altered hood band pattern piece to cut off the red fabric that I would no longer need on one set of the red hoods. I laid the band next to the "now smaller hood," and marked the two edges that I would be sewing together later.  But first I sewed the seam along the hood, using two lines of stretch stitches sewn closely together.  I cut off the excess seam allowance to reduce bulk, press. 

Sew the band onto one hood. This becomes the outside hood. Sew the seam on the solid red hood, and this will become the lining to the hood.  


Place the hoods right sides together, pin, and then sew along the edge that frames the face. DO NOT sew the bottom edge.  I clipped the curved edges, turned the garment right side out, and pressed all seams.  
Before attaching the hood to the shirt, I did some decorative topstitching. The hood edges overlap at the neck seam, so I did not plan to insert a grommet for a string. You may want that design element in your garment.


 Whether the hoods is worn up or down,
 it still adds a wonderful design element.

 I made some matching red knit shorts to go with the outfit.
Smiles,
Deborah


Wednesday, June 13, 2018

Baby Cheetah T-Shirt

My granddaughter loves cheetahs!
She reads about them, has stuffed animal cheetahs, and will watch any animal TV show about them.  Want to know a fact about a cheetah?.... The cheetah is the world's fastest land animal. They can run 70 mph (or 110 kph), which is as fast as cars drive on the highway. The cheetah can reach its top speed in just 3 seconds! She can sprout those facts!
So, when I saw a cheetah fabric panel to purchase a few months ago, I just had to buy it.
Thank goodness for the latest Project Run and Play Challenge to use fabric from your stash and create a new garment. 

She loves it, and I love... that she loves it

Friday, June 8, 2018

Cheetah Top for Girls


Wild Animal Acts = Circus
Image result for cheetah circus 
So, when I started planning my outfit for the Project Run and Play Circus Challenge, I wanted some wild cats!!!


BUT...I also had to make sure my outfit would please a very particular pre-teen.  No cutesy animals prints for her.

So I would like to introduce...


Pre-Teen Cheetah


Pattern on Pattern
2 Different Size Prints in Black and White

Hombre Yellow to Orange

Black and White With a Spot of Orange

Hoodie Outside and Inside

Stripe Runs in 2 Directions

 It's All in the Details
At the bottom of the shirt front, I added a bit of whimsy with this fake drawstring complete with metal grommets.
 A well executed drawstring can look effortless, cool, and casual.


How I Created That Detail
At the bottom of the shirt, I attached a 1 3/4 inch band of striped fabric that had been serged on one side. I used a 1/2 inch seam.
You can see the 4 grommets that had been inserted into the bottom of the shirt previously.  I ran my black and white twill tape through the grommets to create an "X" and then zig-zagged the tape into the 1/2 inch seam allowance. Then, I cut off the excess twill tape.

 Lastly, I folded under the edging to the backside of the shirt and sewed it down by stitching in the ditch. This created a finished 5/8 inch band all around the bottom of the shirt. This band also encased the ends of the twill tape.
 Smiles,
Deborah
Related Posts Plugin for WordPress, Blogger...