Pages

Thursday, March 20, 2014

WILD ZEBRA Rockin' Ballet Dress


The 9th Season of Project Run and Play has begun!  I love this internet sewing contest and am planning on sewing along with all 4 challenges.
 
The first challenge is called, "Put Me in the Zoo" Challenge.  The contestants are to take inspiration from their favorite (or their child's favorite animal) and design and construct an outfit.


Can you guess Miss E's favorite zoo animal?
 

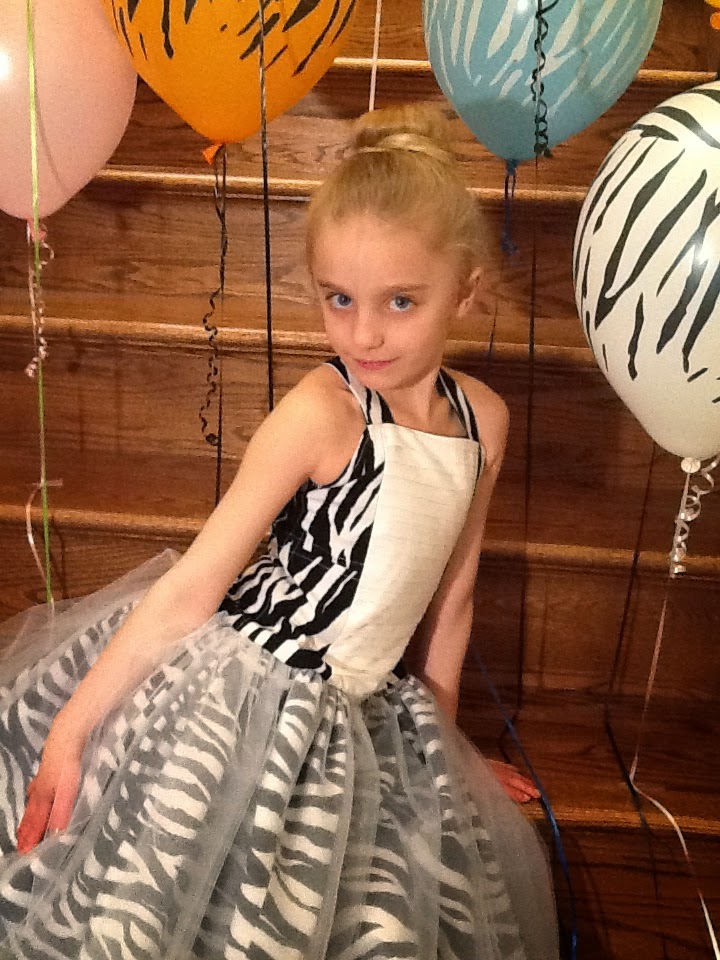
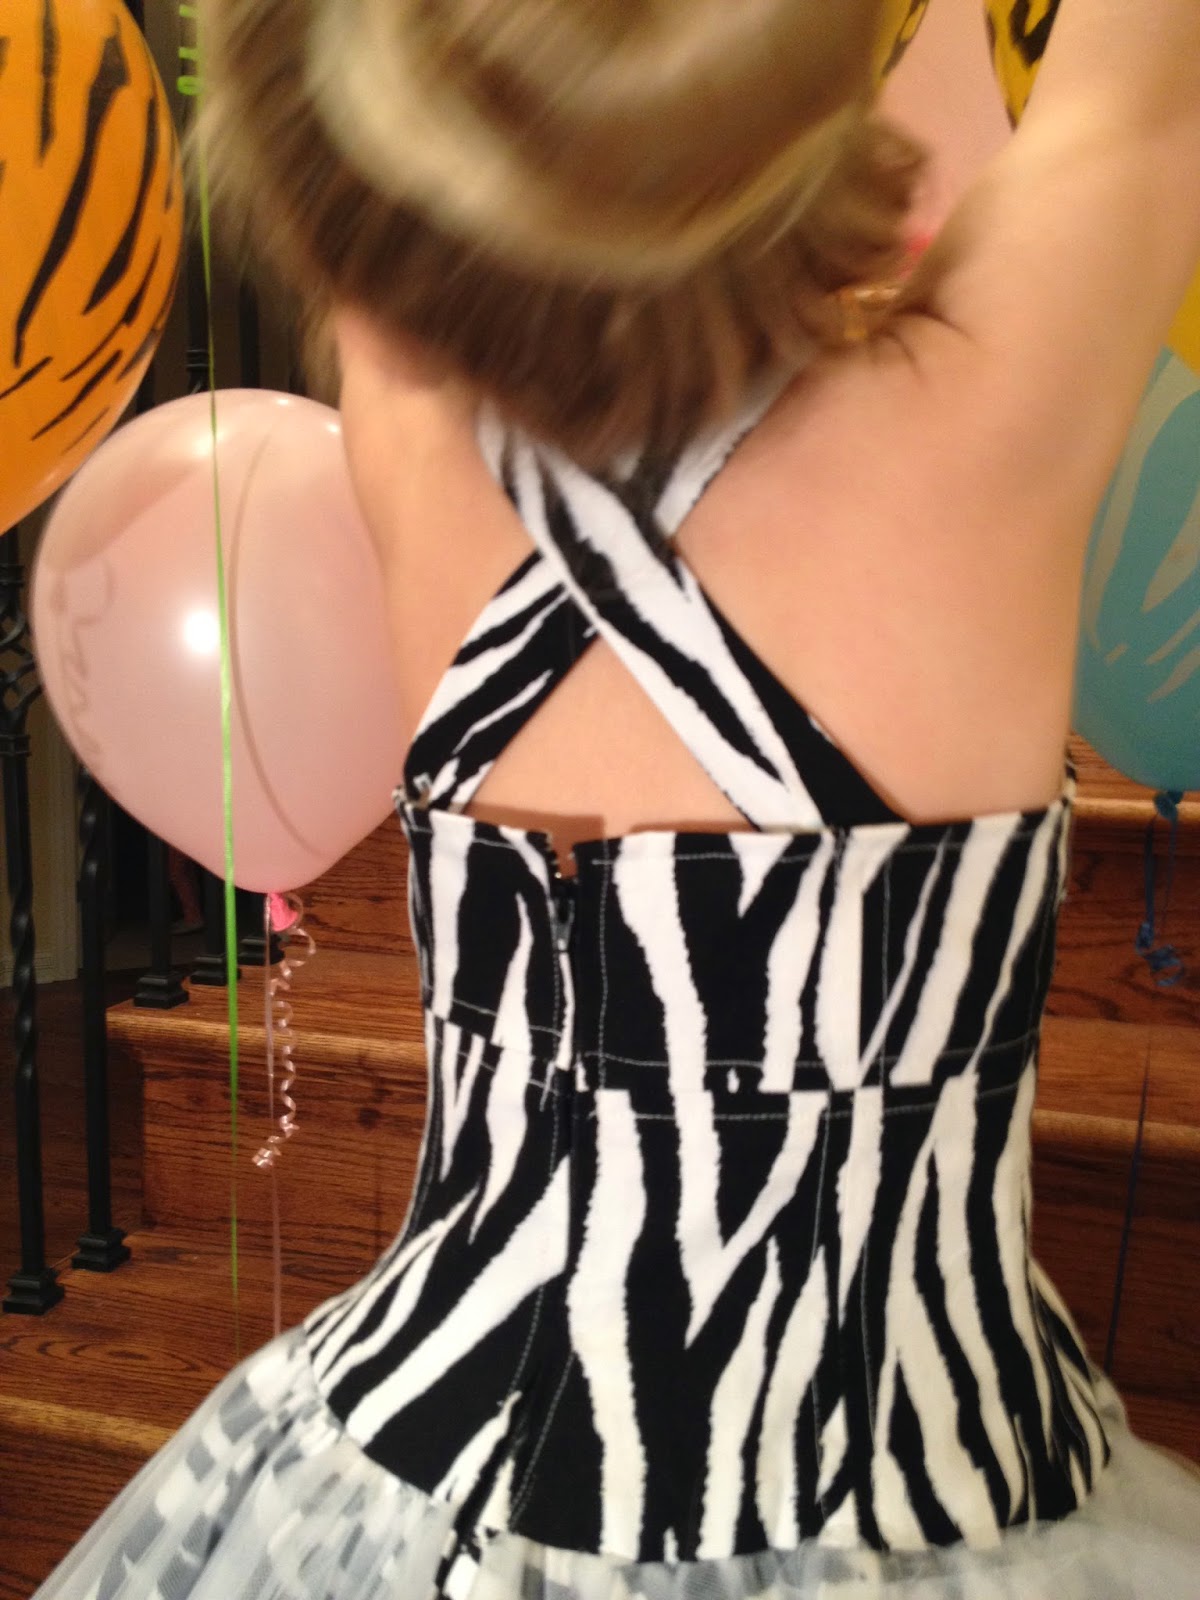
Marty the Zebra from Madagascar 3 singing "Circus Afro"
Drawing source: andrewjonesdraws.com


Therefore my creative design is called:
WILD Zebra Rockin' Ballet Dress

I used Butterick Pattern B5845 for the upper bodice on this dress.

One of the design features that I loved on this pattern are the 14 pieces that make up the front and back of the bodice top. 


 Other than fit alterations, I did make one change in the bodice. That was to combine the 2 pieces of the center front and fill that space with a tucked fabric panel.


When I lined the inside of the bodice, I combined the upper and lower pieces  by over lapping the 5/8 inch seam allowances and then cutting out the combined piece.
So the lining looked like this before I attached it to the dress:


See, that created only 7 pieces for the lining instead of 14. 
 
 
Instead of a gathered petticoat under the dress, I added 4 layers of netting over the cotton poplin zebra fabric. 
 I edged the netting hem edges with 2 different types and widths of ribbon so you could visually tell there were multiple layers.

 
I increased the width of the skirt on the dress to 2 1/2  times the bodice bottom edge, as I wanted the ruffled skirt to be very full. With the four layers of netting and the increased width of cotton poplin to gather, this made it harder to work with, so you have to be willing to give it a go!


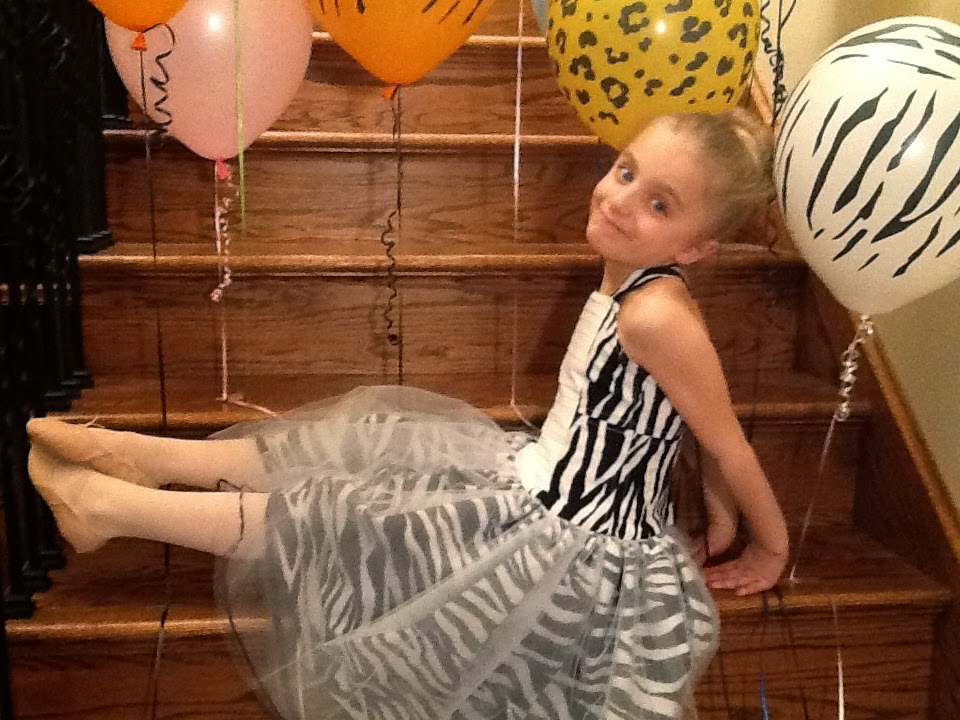
 Notice that the bodice extends below the natural waistline.


If you want to view a tutorial or learn more details about how I created this dress, click on the words below to go to previous posts that I wrote while sewing this dress:

How I created the tucked panel
How I  added ribbon to the edges of the netting 

"I'm a wild zebra!" 
 
 
" But don't put me in the zoo...okay?"
 
Smiles,
Deborah


Wednesday, March 19, 2014

Built-in Bookcase/Windowseat, Part 5

Today, I have a guest interview with Raymond, who is a painter by trade and who showed me a few tricks to caulking on my bookcase/windowseat.


How do you cut the tip of your caulk tubes?
I cut it as small as I possibly can. Notice in the next picture how little he cut off the end of the tip.

Why do you carry a wet rag next to the caulk tube as you work?
I like to keep everything as clean as I possibly can. That includes my fingers and the end of a caulk tube. I also use it to dampen the end of my fingers as I work.  I wipe off the end of the caulk tube before I begin each time. Then I start with a clean tip, and not a glob of caulk.


This shows Raymond caulking a seam:


As soon as he finished going down the whole seam, he immediately wiped his fingertip and the end of the caulk
tube. He does it automatically!
What happens if you make a mistake?
I wipe it off with my damp cloth and start again.  It's easier to add more caulk to an area than ruining the seam because you began with too much caulk to start with.

Thanks Raymond!!!

Smiles,
Deborah

Sunday, March 16, 2014

Built-in Bookcase/Windowseat, Part 4

Once Jeff began adding the connecting arch to the bookcase/windowseat an amazing transformation began to happen. It "all came together."
This connecting support was anchored to the ceiling.
An arch was cut using
a jigsaw, with quite a few adjustments...
for both sides of the arch.
 
I added this picture to show you the depth of the arch on the side of the bookcase.


We were playing around with the molding on top of the arch, and decided to create a keystone. I wish I had my new camera that I ordered to show the detail of the moldings and the keystone that runs through the top of the moldings...sigh!

Here is the completed keystone along with filling in with the molding and crown molding. This area will look fabulous after some caulking is added before painting.

Jeff also finished off all the edges with arches, that were cut out of popular boards, and the back of the arch (so that when you sit in the windowseat the back looks finished too).

The next step is to do a bit more sanding, priming, caulking, and then after wiping down the whole thing with a tack cloth, to actually put on the final layer of paint.  I am using the same color of white paint as the existing molding in my house. I want to look like it has always been here.
 
How many hours have we put into this creation? 
 Thirty-three hours at this point plus the time obtaining supplies, pre-priming, and removal of the hardware. Sometime I think that HGTV gives us a warped idea of how quickly these little projects can be completed. Right?
 
Smiles,
Deborah

Saturday, March 15, 2014

Built-in Bookcase and Windowseat, Part 3

Of course, all the while we were building one bookcase, we were also building the second bookcase on the other side of the room.


Then Jeff connected the 2 units with an open windowseat that is attached to a cleat on the window wall, and is also supported by an inner structure that ties the front panel and legs together. This windowseat is open below because there is a heating vent and 2 electrical outlets that we still wanted access to in the future. Actually, I love the simple design.

The seat will be a total of 19 inches high after I make the padded cushion that will sit on top of the wooden base.

Notice the repeat of the same arched panels that are featured on the bookcases. The wooden legs are made from maple, and were obtained from a company that builds custom stairs. They were a remnant found in their woodworking shop, and were amazing quality! They are not deck posts.

Friday, March 14, 2014

Built-in Bookcase and Windowseat, Part 2


 This built-in bookcase/windowseat will be constructed from a variety of resources-MDF, poplar, Ready-Made China Cabinet, pine molding, plywood, and  poplar molding.  It really doesn't matter as it all will be primed and painted to match the existing woodwork in my house.


So in Part 1,  I told you that we rough cut the MDF into approximate size and I primed the boards on both sides.


This is the china cabinet that I purchased off of Craigslist, and I removed all the glass inserts, hardware, doors, and the one wooden shelf in the center of the cabinet. We also had to remove the existing molding-chair rail, baseboard and crown molding that was all ready there.

The cabinet looks just "okay" in this space, but we are going to build a cabinet underneath it.


Notice that I had to avoid the electrical outlet on the wall. I would have cut away the carpet, but my husband vetoed that idea. I decided it was okay to leave the carpet there because the windowseat will be open and you will see the carpet in that location.  We screwed both cabinets to studs in the wall.


 Here is how the base cabinet turned out after it was fancied up with molding trim, and a cut arch out of a primed poplar board.  The window seat will have matching arches. 

Do you like it?  I sure do. Just image how beautiful it will be once it is caulked and painted.

Smiles,
Deborah

Thursday, March 13, 2014

Creating a Built-in Bookcase and Window Seat, Part I


This empty space in my living room will soon be filled with a built in bookcase and windowseat. Notice the sunlight streaming into the little bay area... I can imagine the perfect windowseat that will soon be there.

To create the built-in, I first purchased a pair of china cabinets on Craigslist. (It has glass shelves that are not shown)
This is what they look like.  I searched for months for just the right kind of cabinet.  I would love to have stained glass cabinets, but that is beyond my budget. When I saw these china cabinets, I could picture them in my built-in cabinet design in my head.


I spent the week-end priming all the rough cut pieces of MDF and wood that will be used in the cabinet.  Why did we rough-cut the MDF? Because sheets of MDF are HEAVY, and I had trouble just carrying it down to my basement to set it up to prime. 
 
 So, Jeff Block from Block Builders, is working with me on this hair-brained (according to my husband) scheme, quickly cut rough-cuts boards to about the dimensions that we are going to need.  Then I could easily carry it down to the basement to prime.
 
Here is a teaser for tomorrows post!!!
 
Smiles,
Deborah
 
Related Posts Plugin for WordPress, Blogger...