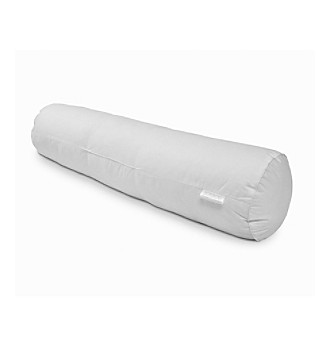
1. Purchased these toddler/ small child body pillows from Carson's flash Internet sale for $19.00.
 Size: 8 inches by 32 inches, cotton fabric, filled with polyester puff ball fiber. Excellent quality.
For the width of the rectangle to cover the middle of the pillow measure the distance around the pillow ends (circumference), Use the diameter (8) times 3.14 (Pi), or use this online calculator , Plus 1" for seam allowances. 8 X 3.14 = 25.12 plus 1 inch seam allowance = 26 1/8 inches wide.
For the length of the rectangle to cover the middle of the pillow measure the pillow form from one end to the other end (32 inches) and add 1 inch for the seam allowance. SO I will cut a a rectangle 26 1/8 inches wide and 33 inches long.
3. For the ends of the pillow cut out 2 circles 8 inch diameter plus 1 inch seam allowance = 9 inches. Look around your house for a circle that size... I used a 9 inch cake pan.
4. Make your piping. I used a 6/32 cotton piping cord, I cut my strips of fabric on the bias. I wanted a finished seam allowance of 1/2 when I was finished making the piping.
This is the most important part... I purchased a piping foot for my sewing machine and it made the job SOOOO much easier. This foot cost around $15.00.
Look at how close to the cotton piping it sews the seam.
4. To attach the piping to the right side of the circle,
seam rip about one and a half inch of the seam on the piping and open up the piping. Cut away some of the cotton piping and fold back the edge of the fabric. Begin sewing on the piping at the stitching line, and NOT at the end.
Next, when you come to where the piping will overlap, cut the end of the piping so it fits right next to the cut off cotton piping.Insert the end so it touches the cotton piping.
4. Sew the piping (Using the piping foot) to the right side of the circle fabric using a 1/2" seam allowance. Overlap the piping as shown above. Clip the seam allowance of the piping seam allowance. Even though it is cut on the bias, clipping the tape will allow piping tape to lay smoothly on the circle.
seam rip about one and a half inch of the seam on the piping and open up the piping. Cut away some of the cotton piping and fold back the edge of the fabric. Begin sewing on the piping at the stitching line, and NOT at the end.
Next, when you come to where the piping will overlap, cut the end of the piping so it fits right next to the cut off cotton piping.Insert the end so it touches the cotton piping.
Fold over the fabric piping end and continue sewing.
4. Sew the piping (Using the piping foot) to the right side of the circle fabric using a 1/2" seam allowance. Overlap the piping as shown above. Clip the seam allowance of the piping seam allowance. Even though it is cut on the bias, clipping the tape will allow piping tape to lay smoothly on the circle.
- Match the edges that are the length of the pillow plus 1"
- Sew the seam, leaving an opening in the seam in the middle.
- Press the seam flat to set the stitches and then press open the seam.
- Bringing right sides together and pin the piped circle in place on the end of the tube of fabric by dividing the circle into fourths with pins, and dividing the tube into fourths and then matching the fourths to ease the circle into the tube.
- Repeat for the other end of the tube.
- Sew the piped circles to ends of the tube of fabric.
- Turn the pillow cover right side out.
- Press and insert the pillow form inside the pillow cover.
- Hand sew the opening closed with a slip stitch.
 |
| Though this isn't the circle, I wanted to show you how easy the piping is to sew when placing the two fabrics together, using the piping foot. |


Great tutorial Deborah, thanks for sharing. Found you at the Do tell Tuesday link up. Pinned!!
ReplyDeletegorgeous, love the window seat and the fabric you chose.
ReplyDeleteThat's a great tutorial. I love the fabric you picked as well. I will be featuring this tonight at my Sizzle into Summer party that opens at 8pm EST. Please stop by and pick up an I've Been Featured button. Thanks. http://diybydesign.blogspot.com
ReplyDeletebrilliant great instructions. I just love how it came out.
ReplyDeleteThis comment has been removed by a blog administrator.
ReplyDeleteVery good written article. It will be supportive to anyone who utilizes it, including me. Keep doing what you are doing – can’r wait to read more posts. Best Bolster Pillows 2018
ReplyDelete