Pages

Wednesday, April 17, 2013

Princess Dress Hangers

I've been participating in the Project Run and Play sew-along. This weeks challenge was to make a formal or special occasion dress.  I thought long and hard about this and had made up my mind to sew a special princess dress for my granddaughters to use in their "Dress Up" area.  They love to dress up and put on special dance  performances for their Mom, Papa (Grandpa) , and Grandmother (me).


Yet, I have to admit that I was reluctant to begin... as visions of the mess they also create with their dresses danced in my head.
 I've tried "Boxes or trunks"..  yuck.
I purchased a cabinet to hang up the dresses in.... and they don't use the Velcro to button up the dress and it falls off the hanger onto the bottom of the cabinet.

So instead of sewing another dress, I put my creative thoughts into solving this problem and created...
Princess Dress Hangers.


It doesn't matter if the Velcro closure is shut

 or Open!
 Here is how you make them. Use a wire hanger that you receive from your dry cleaners.
 In the area where it starts to curve downward, grab a hold of the top and bottom layers. With the other hand grasp the end of the hanger.
 Pull the end upward, and bend the hanger so it looks like this.
 Now, bend the other side of the hanger.

Cut a piece of fleece 3 inches by 2 inches and fold. Sew along the bottom to form a tube.

 Slip the tube onto the end of the hanger. Then put the hanger and tube under your presser foot and tighten the tube by sewing the outward edge closer to the wire hanger.

 I sewed a long tube and then cut them into individual pieces, as I was making quite a few Princess dress  hangers.
 
This is what the hanger looks like when you are finished. Notice that I placed a tension rod in between two storage cabinets in the girls playroom area. The rod is placed so the long dresses are just off the floor.
I wanted the girls, ages 4 and 6 to be able to hang them up  themselves without my help.

 
I taught them how to put the dresses on the hangers.
 
Scoop one side and then scoop the other side!
 
The dress slips into the fleece valley and stays there.
 
SO... this is my creative formal dress idea.
 
Deborah
 
Also Linking up to :Train To Crazy's Linky Party

Sunday, April 7, 2013

Fat Quarter Dress

This week's challenge on Project Run and Play is "Details."


Deborah used the following details while creating this dress:
Distinctively unique embroidery 
 
Experimenting with fabric  
    For example, the applique work on this dress came from a pre-printed fabric panel. I cut out the individual designs that I wanted to add to my dress adding a 1/8 inch margin all around the design. Next, I finger pressed the 1/8 inch margin under and basted it in place. After placing it in position on the dress, I hand stitched it to the dress.

Basic sewing skills that I am always striving to improve.
 This outfit features  applied ribbon on each seam. I tried a new technique using 1/4" fusible webbing to temporarily hold it into place until it was topstitched. This resulted in smoothly applied ribbon, and it also made it so much easier!
 
Oh, how I love choosing colors and patterns that work together.
       This dress combines 4 different colored fat quarters, and a fabric panel. The turquoise fabric was actually considered a "Christmas fabric" of a stylized snowball, but I thought it blended well and was in the 40% off stack. Turquoise is a wonderful color that makes a big splash.  Since you see turquoise used a lot in current fashions, I was able to find  cute turquoise shoes to complement Miss C's dress. 
 
Resourceful- whether I am using new or recycled materials.
      Here I used the reverse side of the ribbon, because it was the perfect color!
 Don't forget to check out the reverse side of the ribbon. One time I used both sides of a  ribbon in a single garment to give it a unique look.


Appliqued heart shapes provided the inspiration for the heart shaped buttons down the back of the dress. Repeating a pattern creates a flow in the design.

Happiest when my sewing creations bring joy to others.
     I love creating and individualizing designs for the people I sew for in my life. Miss C likes bright colors, AND my daughter challenged me to use more vibrant color combinations. I have a tendency to use pink, pastels, and small prints.

    Using the fat quarters gave me just the push I needed to experiment with vibrant colors.
I used the pattern,
 "Olivia's Best Dress"
 by Emily Taylor.


I hope you enjoyed my dress. 

P.S.  I love when you leave comments, because it  makes me feel like I am  connecting with another person that loves sewing like  I do :)


Deborah


L.  


Wednesday, March 27, 2013

Watercolor

I love watercolors. I love how the colors flow from dark to light without having to stay within the lines.

That's why I chose to use watercolor as my design inspiration for my sew along project for Challenge One from Project Run and Play.  This watercolor painting is by Rose Ann Hayes. 

This is the dress that I created from my watercolor inspiration.
It features a full lined gathered skirt with a sparkly knit pink bodice.


It all started with a gathered skirt I bought 3 years ago on the clearance rack, because the skirt matched a pair of shoes that I had purchased. I thought I would take it apart and create a shirt for myself.  I don't wear gathered skirts anymore, and I bought the biggest size available to get the most material. I couldn't resist because you know how much I love the look created by watercolors.

 I cut out a front bodice and two back bodices and sewed the edge of the waistband to the 5/8" mark. I centered the 2 back bodices on the fabric in a way to utilize the zipper. (Which was a bit tricky! ) Then I cut down the skirt and the lining to create the individual pieces


I finished the back with a self loop and a button. Remember that the lower skirt incorporated the existing hidden zipper from the original skirt. 


And that is how I created my inspiration dress.
 
 She wore it yesterday at a Community Event in a large gym.
  I saw her skipping down the aisle and heard a lady comment,"There goes a little bit of Spring.  Doesn't seeing that youthful joy just make you smile."
Deborah


Wednesday, February 6, 2013

Creating a Special Place Just for Kids.

Okay, today I am taking a break from sewing. I told you that we bought a new house, but we can't move in just yet.  The house has a lot of "bumps and bruises" from the last owner and we must fix them first.

I also want to create a special play area in the basement for my two granddaughters that live with us.  I want it to be a place that says, "This is your home too."


So the first thing that I did was to paint the basement concrete walls with white masonry paint. Let me tell you that concrete soaks up the paint, even though this paint has primer included in the paint.


But I sure love how fresh and clean it make the space look.


Next, I put down soft cushiony mat 2 x 2 squares in 4 different colors. I just placed them randomly. I even cut them out so they would fit close up to the wall.  My husband helped me. With the white walls and primary colored mats, the space now is beginning to feel welcoming.

 
Here is the first item that I added to the playroom, "Barbie's Dreamhouse."  I forgot that it was in the attic, and now that I have been packing I rediscovered it.  I went on the internet and found tons of links about how to construct your own Barbie Dream House furniture. I thought that might be a fun project for my granddaughters and I to do together.  I think we passed the furniture on to a friend of ours when she was young so she could play with it.

Deborah
 

Monday, February 4, 2013

2 Shirt Sundress

It all started with 2 Men's shirts that belonged to her Grandfather (Papa).
One was a very small blue, white, and yellow plaid, and the second was a light yellow oxford.


My inspiration was from Simplicity pattern 2265. When I spied this design, I could picture it a remake using men's shirt with the "gathered flower petals" on the front. So I cut and measured and created a similar design until 2:00 am in the morning because it was so much fun!

As you create the dress you keep thinking...
how can I creatively use the parts of the shirt?
If you click on the picture it will enlarge so you can see the details.
 
 
First, I have to thank my lucky stars that the side seams in the Men's shirt was matched, and that the shirt was cut on grain!!!!!  It made it easy to cut around the entire width of the shirt using the plaid as my cutting guide.  That piece was then gathered at the top to create the dress front and back. I just loved using that front button tab down the back and not making any buttonholes or sewing on a button to match.  YEAH!
 
The front and back bodice were cut from the sleeves of the plaid shirt. 
 
 THEN I had the idea to use the cuffs as the shoulder straps...... that made me smile :)
 
 
I utilized the placket in the sleeve when cutting the back bodice, which was a bit tricky to finish the edge on the other side.
I needed to add two button holes in this area.

 
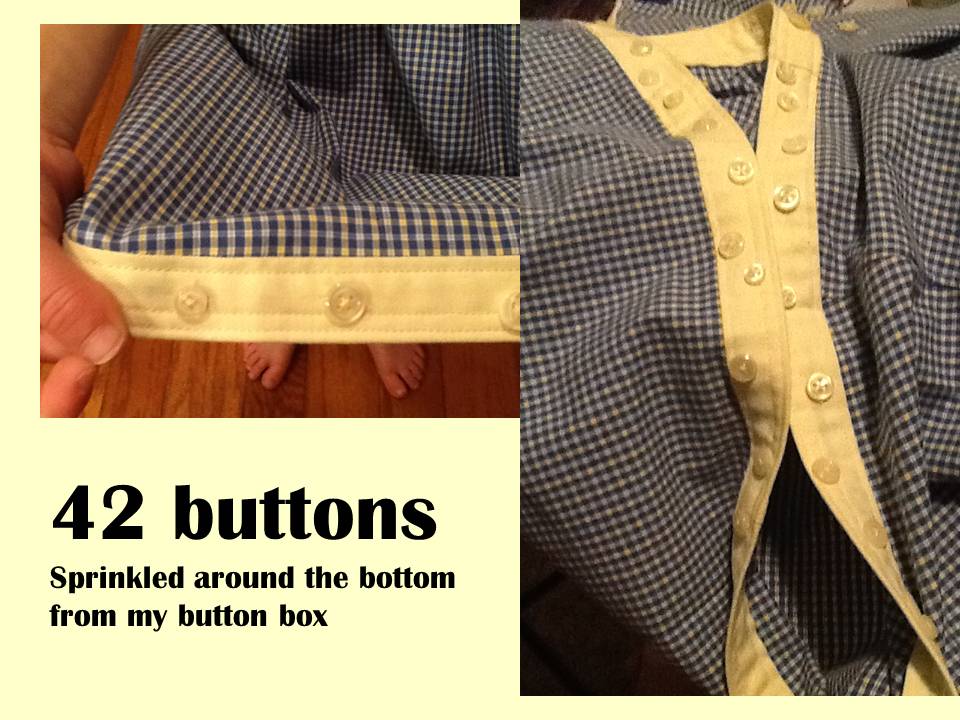
I finished the bottom of the dress with a strip of fabric from the yellow oxford. Then I added all these buttons from my button box.  Before I throw one of my husband's shirt away, I always cut off the buttons and save them, so I had lots to choose from.
 
 
A funny story about those buttons is that I sewed most of them on at the car repair shop while I waited for my car to be repaired. One of the mechanics took my picture to show his wife that women really do know how to sew on buttons. 
 
He took a step by step sequence to show his wife
"How to Sew on a Button".
 
To finish the raw edges in the inside,  I buttoned on the button side of the shirt, and then turned under the edges of each side and hand stitched the edges shut. Originally, I was only going to have the empty buttonholes on this strip, but this finished the inside so it was smooth as E wears the sundress.
Papa likes to tease E that she's wearing his shirt, and she loves it even more because of that.
  I can't wait to make my next creation as this one was SO MUCH FUN!

Deborah
Here's your link back to Project Run and Play.  I hope you enjoyed seeing my sundress as much as I enjoyed creating it.
Please leave a "trail of your thoughts" as I so enjoy reading them.
 
 
Related Posts Plugin for WordPress, Blogger...